Overview
As network engineers, we are very much used to making configuration changes via the CLI, something we've relied on since the start of our networking careers. However, in the past few years, there has been a push towards network automation, with tools like Ansible and Python becoming popular for managing configurations. The best way to learn network automation is by incorporating it into your daily job. And what better way to start than using Ansible to manage your VLANs?
VLANs are something most, if not all of us use daily. Creating multiple VLANs on a single switch isn't a big task, but what if you need to do it across many switches? You could use VTP (VLAN Trunk Protocol), but we all know the risks involved, some of us may have had bad experiences using VTP.
In this blog post, we'll look at how to use Ansible to manage VLANs across multiple switches. We will also touch on assigning the VLAN to an interface. By the end of the example, you should have a clear understanding of how it works and the benefits Ansible offers over manual configuration.
Manual Approach
Before moving on to Ansible, let's look at how we would configure VLANs manually. It's as simple as SSHing into the switch and creating the VLAN. If you need to configure it across multiple switches, you simply repeat the process on each one.
vlan 10
 name USERS
If you then need to configure an interface and assign this VLAN to it, the configuration might look something like this.
interface Et0/1
 switchport mode access
 switchport access vlan 10
The main challenge with a manual approach is that you might miss a switch or forget to configure one. Later, when that switch needs the same VLAN, you'll have to create it manually, which can lead to inconsistencies and become a mess over time.
Ansible Approach
Ansible is an automation tool that allows you to manage network devices using simple YAML files. It works by connecting to devices over SSH (and some other means) and applying the desired changes.
When using Ansible to create VLANs, you define an inventory, which is a list of devices, and then specify the VLANs you need to create. Ansible takes care of the rest by SSHing into the switches and configuring the VLANs. If a VLAN already exists, Ansible won't recreate it due to idempotency (we'll cover this later in the post).
Please note that Ansible is not limited to managing network devices. It can also be used to manage a wide range of devices, including Linux hosts, Windows systems, firewalls, and network devices from various vendors. Ansible is part of a large ecosystem designed to simplify automation across diverse environments.
Ansible Installation
This blog post assumes you are somewhat familiar with basic command-line tools. If not, you can still follow along, so don’t worry. Ansible can be installed on Windows, macOS, and Linux. In this example, I'm using macOS, but the process should be similar for other operating systems.
If you don’t have Ansible installed, you can easily install it using pip, a package manager for Python that allows you to install and manage Python libraries. Feel free to check out the official Ansible installation guide below.

As always, before installing any pip modules, it's best to create a virtual environment (venv) to keep your packages isolated. A virtual environment helps prevent conflicts between different Python projects. You can create and activate one using the following commands.
python3 -m venv venv
source venv/bin/activate
Now, install Ansible using the following command.
pip install ansible
Once the installation is complete, you can verify it by running ansible --version command. This will display the installed Ansible version, confirming that the installation was successful.
Ansible Initial Setup
Now that we have installed Ansible, let's set up some initial configurations.
Ansible uses a configuration file called ansible.cfg, which defines settings like connection types and log locations. By default, Ansible looks for this file in /etc/ansible/ansible.cfg. However, you can create a project-specific ansible.cfg in your project’s root directory, and Ansible will prioritize that over the default one.
We also need to create an inventory file to list the switches and specify the device types and credentials for Ansible to use.
Creating the Configuration File
First, create a project folder (called ansible_vlan in this example) and inside it, create a file called ansible.cfg with the following contents.
ansible.cfg
[defaults]
host_key_checking = False
inventory = inventory/hostfile.yml
host_key_checking = False- Disables SSH host key checking. This prevents Ansible from causing issues when connecting to a new switch for the first time.inventory = inventory/hostfile.yml- Tells Ansible where to find the inventory file, which lists the switches it will manage.
Creating the Inventory File
In Ansible, an inventory is a file that lists the devices (hosts) Ansible will manage. It tells Ansible what devices to manage. The inventory can be organized into groups and subgroups, making it easy to apply configurations to specific sets of devices. For network engineers, this is particularly useful as you can group devices by role (core switches, access switches), by location (data centre, branch offices), or by vendor (Cisco, Juniper, Arista).
Create a file named inventory.yml with the following contents.
inventory.yml
all:
  children:
	switches:
  	hosts:
    	core-01:
      	ansible_host: 192.168.100.210
    	core-02:
      	ansible_host: 192.168.100.211
    	access-01:
      	ansible_host: 192.168.100.212
    	access-02:
      	ansible_host: 192.168.100.213
Here, we have defined four switches and grouped them under switches. In the YAML format, groups are structured under children, making it easy to organize devices logically. If we had routers, firewalls, or different switch platforms, we could create separate groups like routers, firewalls, or cisco_switches. This helps manage configurations more easily across different device types.
Now that we have a list of devices, Ansible still doesn’t know what type of devices they are or the credentials needed to connect. These could be network devices or Linux servers, so we need to specify exactly how Ansible should connect. Instead of defining this for each device, we can set it for the entire switches group using group_vars.
group_vars is a directory where we define settings for specific groups of devices. At the root of the project, create a subdirectory called group_vars, then create a file named switches.yml (the filename must match the group name).
switches.yml
---
ansible_connection: ansible.netcommon.network_cli
ansible_network_os: cisco.ios.ios
ansible_become: yes
ansible_become_method: enable
ansible_user: admin
ansible_password: admin
ansible_become_password: admin
This tells Ansible that these devices use the Cisco IOS platform, along with the necessary login credentials. The ansible_become_method: enable setting is used to enter privileged mode (enable mode) on Cisco devices.
In a production environment, it’s important not to expose credentials in plain text. Ansible provides several ways to secure credentials, such as using Vault to encrypt sensitive data, storing them in environment variables, or prompting for the password during playbook execution.
Ansible Playbook
In Ansible, a playbook is a YAML file that defines a set of tasks to be executed on remote managed devices. It allows you to automate repetitive tasks, deploy applications, manage system settings and many more. Playbooks provide a structured way to describe what needs to be done, ensuring consistency across multiple devices.
Below is a simple playbook to create a VLAN on all switches.
vlan_playbook.yml
---
- name: "VLAN Playbook"
  hosts: switches
  gather_facts: no

  tasks:
	- name: VLAN Config
  	cisco.ios.ios_vlans:
    	config:
      	- name: USERS
        	vlan_id: 10
This playbook targets all devices in the switches group, as specified in the hosts field. The gather_facts: no setting disables automatic fact collection, which is not needed for this task.
The playbook contains a single task named "VLAN Config", which uses the cisco.ios.ios_vlans module to configure VLANs on Cisco IOS devices. The config section defines the VLAN name as USERS and assigns it VLAN ID 10. When executed, Ansible will connect to each switch and ensure that VLAN 10 with the name USERS is configured. If the VLAN already exists, Ansible will not create it again due to its idempotent nature.
To verify, I can log in to one of the switches and run the usual show vlan command.
core-01#show vlan

VLAN Name                         	Status	Ports
---- -------------------------------- --------- -------------------------------
1	default                      	active	Et0/1, Et0/2, Et0/3, Et1/0, Et1/1, Et1/2, Et1/3
10   USERS                        	active
1002 fddi-default                 	act/unsup
Callout Box - Idempotency means Ansible only makes changes if needed. If VLAN 10 already exists, Ansible won’t recreate it. This prevents unnecessary modifications and ensures consistency across devices.
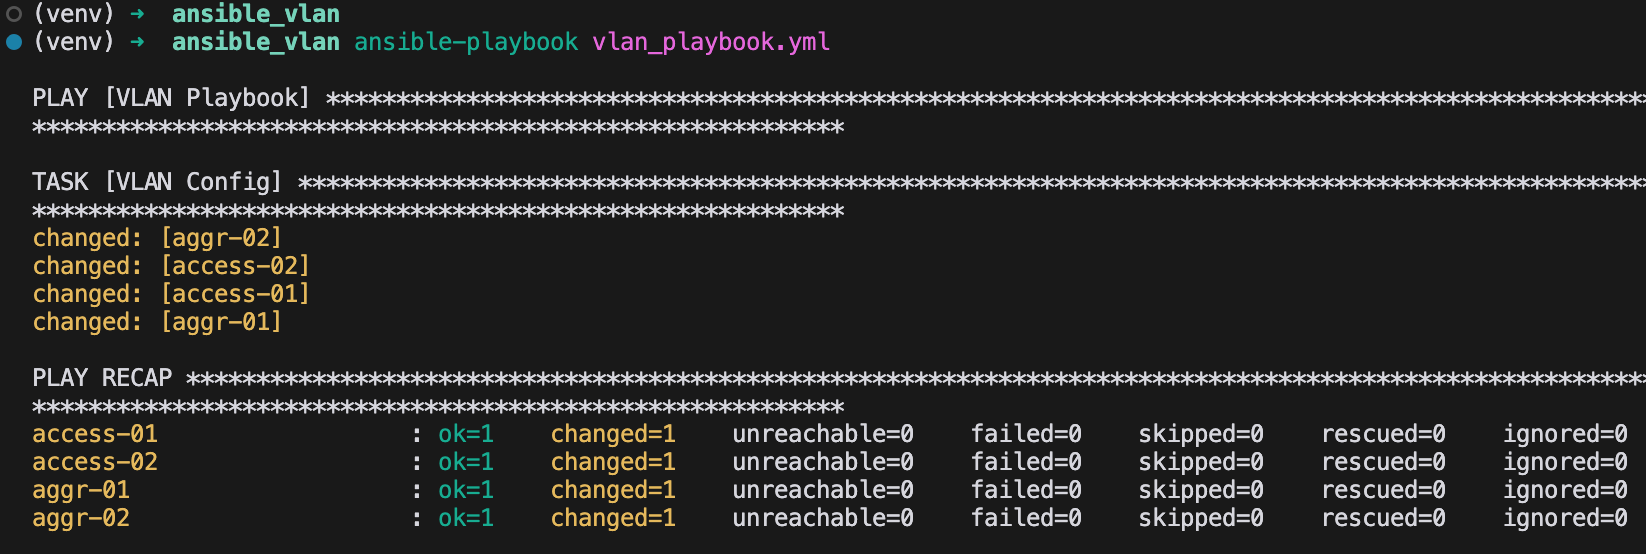
The output displays the results of the Ansible playbook execution. The play begins with the title [VLAN Playbook], showing that the playbook has started. Under TASK [VLAN Config], the specific task of configuring VLANs is executed. Each device listed, such as aggr-02, access-02, access-01, and aggr-01, is marked with changed, which appears in yellow. This indicates that Ansible made changes on these devices, specifically creating or modifying the VLAN configuration.
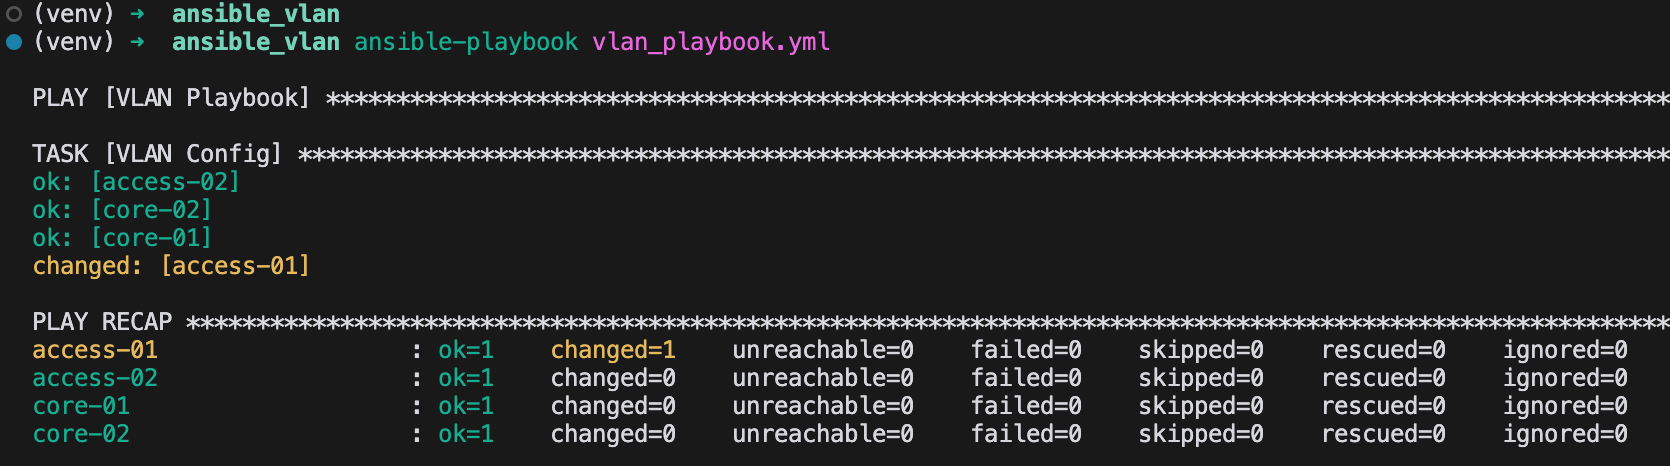
To test idempotency, I manually removed VLAN 10 from the switch access-01 and then re-ran the playbook.
access-01(config)#no vlan 10
access-01(config)#end
access-01#
As you can see in the screenshot, Ansible made changes only to access-01 while the other switches were left unchanged.
Creating More VLANs
Creating a second VLAN is as simple as adding it to the same task. Here, I’m adding a new VLAN called SERVERS with the ID 20
---
- name: "VLAN Playbook"
  hosts: switches
  gather_facts: no

  tasks:
	- name: VLAN Config
  	cisco.ios.ios_vlans:
    	config:
      	- name: USERS
        	vlan_id: 10
      	- name: SERVERS
        	vlan_id: 20
When this playbook is executed, Ansible will create VLAN 20 on all the switches in addition to VLAN 10, if it's not already present. To verify, I logged in to the switch and confirmed that VLAN 20 is now listed along with VLAN 10, as expected.
core-01#show vlan

VLAN Name                         	Status	Ports
---- -------------------------------- --------- -------------------------------
1	default                      	active	Et0/1, Et0/2, Et0/3, Et1/0, Et1/1, Et1/2, Et1/3
10   USERS                        	active
20   SERVERS                      	active
1002 fddi-default                 	act/unsup
Interfaces Configuration
Before we wrap up, let's take a quick look at how we can assign a VLAN to an interface. There are multiple ways to do this, and you also need to consider that not all switches will have the same interface configuration. However, to keep this example simple, let’s assume we want to assign VLAN 20 to interface Et0/1 on all switches.
We can either create a separate playbook for this or update the existing one to include both VLAN and interface configurations. I’m going to simply update the existing playbook.
Here, I added another task and renamed the play to reflect that we are configuring both VLANs and interfaces. Once the playbook runs, interface Et0/1 on all switches will be assigned to VLAN 20.
---
- name: "VLAN and Interface Playbook"
  hosts: switches
  gather_facts: no

  tasks:
    - name: VLAN Config
      cisco.ios.ios_vlans:
        config:
          - name: USERS
            vlan_id: 10
          - name: SERVERS
            vlan_id: 20

    - name: Interface Configuration
      cisco.ios.ios_l2_interfaces:
        config:
          - name: Et0/1
            mode: access
            access:
              vlan: 20
Here is an output from access-01.
access-01#show run interface et0/1
Building configuration...

Current configuration : 80 bytes
!
interface Ethernet0/1
 switchport access vlan 20
 switchport mode access
end
Closing Up
I hope this post has shown the benefits of using Ansible for managing your network devices. As you’ve seen, there’s no need to know the exact Cisco CLI commands for creating VLANs, Ansible handles all of that in the background. By simply defining the desired state, such as ensuring VLANs 10 and 20 are present, Ansible takes care of achieving that state for you.
We’ve only scratched the surface here! Stay tuned for upcoming posts where we'll dive deeper into automating your network with advanced Ansible techniques and best practices.
Sponsored by