Introduction
Within this article, we will detail the steps required to build a simple networking topology in Neutron using the OpenStack CLI.
Topology
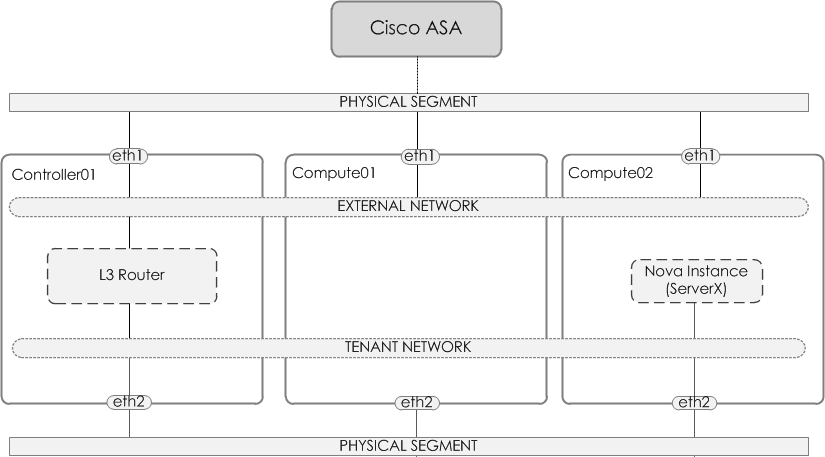
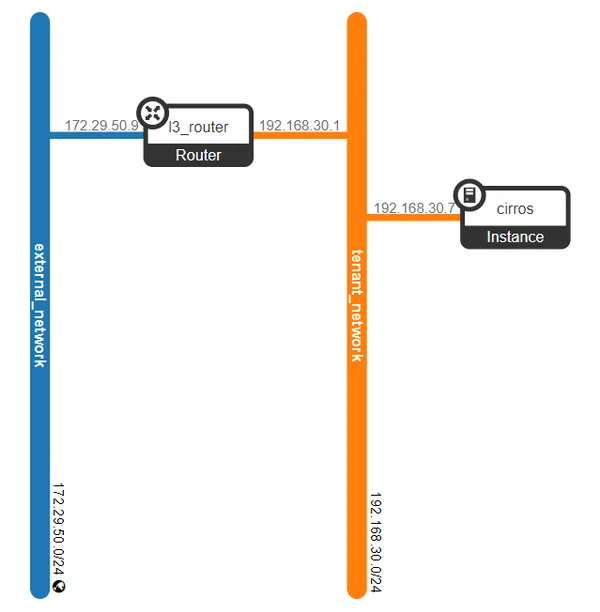
Our topology (Figure 1) will consist of an L3 router, an external network, a tenant network and a range of floating IPs. Our external network will be a VLAN based network and segment traffic using a VLAN tag of 50.

Figure 1 - Topology
Neutron Components
Before we dive into the configuration steps, lets quickly look at each of the components that we will use to build our topology,
- Provider Network - Provides a physical network mapping. This provides the ability to use a physical gateway for the instances.
- External network - The external network allows for 'external' connectivity to the neutron (i.e L3) router. In turn, allowing (via floating IPs) access into the instance.
- Tenant network - The network that your virtual instances will reside on.
- L3 Router - An L3 router, much like a physical router provides connectivity between networks and is also able to perform network address translation (NAT).
- Floating IPs - Floating IPs are synonymous to Static NAT i.e they provide a 1-to-1 mapping. This provides the ability for inbound connectivity from the external network into the instance.

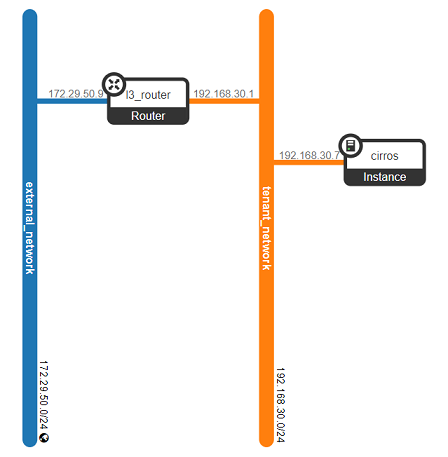
Figure 2 - Network Topology and Components
Physical Gateway
Before we start with configuring Neutron, the physical gateway (in our case a Cisco ASA5505) is configured to provide remote connectivity. Within our configuration, we simply configure a trunk and the corresponding VLAN (i.e the provider segment aka VLAN 50).
interface Ethernet0/4
 description ## OPENSTACK TRUNK ##
 switchport trunk allowed vlan 50
 switchport trunk native vlan 1
 switchport mode trunk
 speed 100
 duplex full
!
interface Vlan50
 nameif OPENSTACK-EXTERNAL-NET
 security-level 100
 ip address 172.29.50.1 255.255.255.0
External Network
So the first Neutron component we will configure will be the external network. This will be a VLAN network and will segment traffic using a VLAN tag of 50.
openstack network create --provider-network-type vlan \
                        --provider-physical-network physnet1 \
                        --provider-segment 50 \
                        --external \
                        --share \
                        external_network

openstack subnet create --subnet-range 172.29.50.0/24 \
                       --network external_network \
                       --no-dhcp \
                       --gateway=172.29.50.1 \
                       --allocation-pool start=172.29.50.2,end=172.29.50.100 \
                       external_subnet
NOTE: You may be asking, where does physnet1 come from, as provided above via '--provider-physical-network'. This is the mapped name to the physical interface for the network type (flat, vlan etc). You can find this defined within the configuration files such as linuxbridge_agent.ini or openvswitch_agent.ini. For example:
cat linuxbridge_agent.ini
...
[linux_bridge]

physical_interface_mappings = flat:eth12,vlan:br-vlan
Tenant Network
Next, we create the tenant network and tenant subnet.
openstack network create tenant_network
openstack subnet create tenant_subnet \
                        --subnet-range 192.168.30.1/24 \
                        --network tenant_network
L3 Router
Finally, we create the L3 router, along with assigning the external network and tenant subnet to it.
openstack router create l3_router
openstack router set l3_router --external-gateway external_network
openstack router add subnet l3_router tenant_subnet
Validate
Now that we have configured the networking, we now need to test connectivity.
To do this we will spin up a Nova instance, attach it to our tenant network, assign it a floating IP and then check that we can reach it via the floating IP. Let's go...
Create Server
Our server will be based upon Cirros, which is an extremely lightweight Linux distro for testing. First, we create a flavor, then we create an image, then finally we build a server from the image.
wget http://download.cirros-cloud.net/0.4.0/cirros-0.4.0-x86_64-disk.img

openstack flavor create --id 1 --ram 256 --vcpus 1 --disk 1 m1.nano

openstack image create \
    --container-format bare \
    --disk-format qcow2 \
    --property hw_disk_bus=ide \
    --file cirros-0.4.0-x86_64-disk.img \
    cirros-image

openstack server create cirros \
--image cirros-image \
--flavor m1.nano \
--network tenant_network
Create Floating IP
Next, we create a floating IP within the external network. This IP is then assigned to our cirros server.
openstack floating ip create  external_network --floating-ip-address 172.29.50.7
openstack server add floating ip cirros 172.29.50.7
Remove Port Security
Port security is typically enabled by default. It does a few things, one of those things is denying access if there is no security group assigned. Therefore in our example, we need to disable port security. In a real-world scenario, we would just create the security groups and assign them to the necessary ports.
openstack port list | grep <servers_fixed_ip>
openstack port set --disable-port-security --no-security-group 167b6862-5d3f-4e74-9096-ebdb152a34cb
Connect
With all of this configured, you should now be able to access your server via the Floating IP/L3 Router.
$ ping 172.29.50.7 -n 3

Pinging 172.29.50.7 with 32 bytes of data:
Reply from 172.29.50.7: bytes=32 time=4ms TTL=62
Reply from 172.29.50.7: bytes=32 time=5ms TTL=62
Reply from 172.29.50.7: bytes=32 time=6ms TTL=62

Ping statistics for 172.29.50.7:
    Packets: Sent = 3, Received = 3, Lost = 0 (0% loss),
Approximate round trip times in milli-seconds:
    Minimum = 4ms, Maximum = 6ms, Average = 5ms

$ ssh cirros@172.29.50.7
The authenticity of host '172.29.50.7 (172.29.50.7)' can't be established.
ECDSA key fingerprint is SHA256:L4imssvVZhKm35niJ3FHppOqr+YLhJMAUiT6Hw1KKxI.
Are you sure you want to continue connecting (yes/no)?


